Deutsch
 Português
 한국어
 Türkçe
 عربي
 русский
 Việt Nam
 日本語
 Italiano
 Français
 Español

Hey there, fellow forklift enthusiasts! I'm a supplier of forklift parts, and I've seen firsthand how improper installation can lead to all sorts of headaches down the road. That's why I'm here to share some tips on how to install forklift parts correctly. Whether you're a seasoned mechanic or a DIYer looking to save some cash, these pointers will help ensure your forklift runs smoothly and safely.
Pre-Installation Preparation
Before you start installing any forklift parts, it's essential to do your homework. First and foremost, gather all the necessary tools for the job. This might include wrenches, sockets, pliers, and a torque wrench. Having the right tools on hand will make the installation process much easier and more efficient.
Next, make sure you have the correct part. Check the part number and specifications against your forklift's manual to ensure a proper fit. If you're not sure which part you need, don't hesitate to reach out to us. We're here to help you find the right component for your specific forklift model.
It's also a good idea to clean the installation area thoroughly. Remove any dirt, grease, or debris that could interfere with the installation process. This will help ensure a secure fit and prevent premature wear and tear on the new part.
Understanding the Installation Process
Once you've got everything ready, it's time to dive into the installation process. But before you start, take a few minutes to study the installation instructions carefully. These instructions are your roadmap to a successful installation, so make sure you understand them before you begin.
If you're replacing a part, it's often a good idea to take pictures of the old part and its installation before you remove it. This can be a helpful reference later on, especially if you run into any questions or issues during the installation process.
When removing the old part, be careful not to damage any surrounding components. Use the appropriate tools and techniques to ensure a clean and safe removal. If you're having trouble removing a part, don't force it. Instead, take a step back and reassess the situation. You may need to use a different tool or approach to get the job done.
Installing the New Part
Now that you've removed the old part, it's time to install the new one. Start by carefully aligning the new part with the installation area. Make sure all the holes and mounting points line up correctly before you start tightening any bolts or screws.
When tightening bolts and screws, use a torque wrench to ensure they're tightened to the correct specification. Over-tightening can damage the part or the surrounding components, while under-tightening can lead to loose connections and potential safety hazards. Refer to your forklift's manual for the recommended torque settings.
If you're installing a part that requires lubrication, make sure you use the right type of lubricant. Using the wrong lubricant can cause damage to the part and reduce its lifespan. Again, refer to your forklift's manual for the recommended lubricant.
Checking and Testing
Once you've installed the new part, it's crucial to check your work carefully. Make sure all the bolts and screws are tightened properly, and there are no loose or missing components. Inspect the installation area for any signs of damage or wear.
Before you put the forklift back into operation, it's a good idea to test the new part to make sure it's working correctly. This might involve running the forklift through a few basic maneuvers or performing a diagnostic test. If you notice any issues or abnormalities during the test, stop immediately and investigate the problem.


Specific Parts Installation Examples
1. Dust Cover Red Soft for SB175 Connector
The Dust Cover Red Soft for SB175 Connector is a simple but important part. It protects the connector from dust and debris, which can cause corrosion and electrical problems. To install it, first, make sure the connector is clean and dry. Then, carefully slide the dust cover over the connector until it fits snugly. Check that there are no gaps or loose areas where dust could enter.
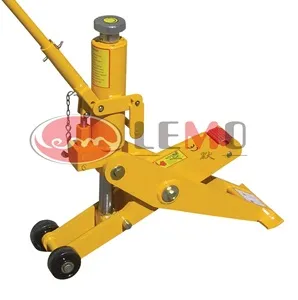
2. 4.0t ForkLift Jack For Repairing
The 4.0t ForkLift Jack For Repairing is used for lifting the forklift during maintenance. When installing it, place the jack on a flat and stable surface. Position it under the designated lifting point on the forklift. Make sure the jack is centered and aligned properly. Then, slowly pump the jack to raise the forklift to the desired height. Check the stability of the forklift and the jack before proceeding with any repair work.
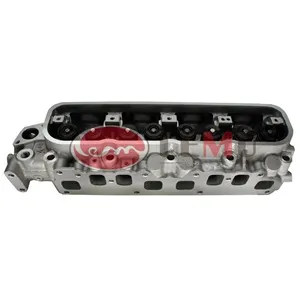
3. 11040-FY501 91H20-00310 Cylinder Head 11040-FY502
Installing the 11040-FY501 91H20-00310 Cylinder Head 11040-FY502 is a more complex process. First, make sure the engine block is clean and free of any debris. Carefully place the cylinder head on the engine block, aligning the bolts holes. Install the bolts and tighten them to the specified torque in a crisscross pattern. This helps to ensure even compression. After installation, check the valve clearances and perform a leak test.
Conclusion
Installing forklift parts correctly is crucial for the safety and performance of your forklift. By following these tips and guidelines, you can ensure a successful installation and avoid costly mistakes. Remember, if you have any questions or need further assistance, don't hesitate to reach out to us. We're here to help you keep your forklift in top shape.
If you're in the market for high-quality forklift parts, look no further. We offer a wide range of parts at competitive prices. Contact us today to discuss your specific needs and start your procurement process. Let's work together to keep your forklifts running smoothly!
References
- Forklift maintenance manuals from various manufacturers.
- Industry best practices for forklift part installation.